How to Create Ubuntu VM in VirtualBox – Step by Step Guide

VirtualBox is an open-source hypervisor for x86 virtualization. It allows you to create virtual machines on your existing operating systems. VirtualBox can be installed on Windows, macOS, Linux, Solaris and OpenSolaris.
In this tutorial we will learn how to create Ubuntu VM in VirtualBox. This article will guide you through step by step process right from downloading the image to launching Ubuntu.
Before we begin, as a pre-requisite you should have VirtualBox already installed on your system. If you still haven’t done that, click here to open VirtualBox downloads page. On this page, choose the platform package based on your OS, download and install the same.


Once you have VirtualBox downloaded and installed, follow these steps to create Ubuntu VM in VirtualBox.
Download Ubuntu ISO file
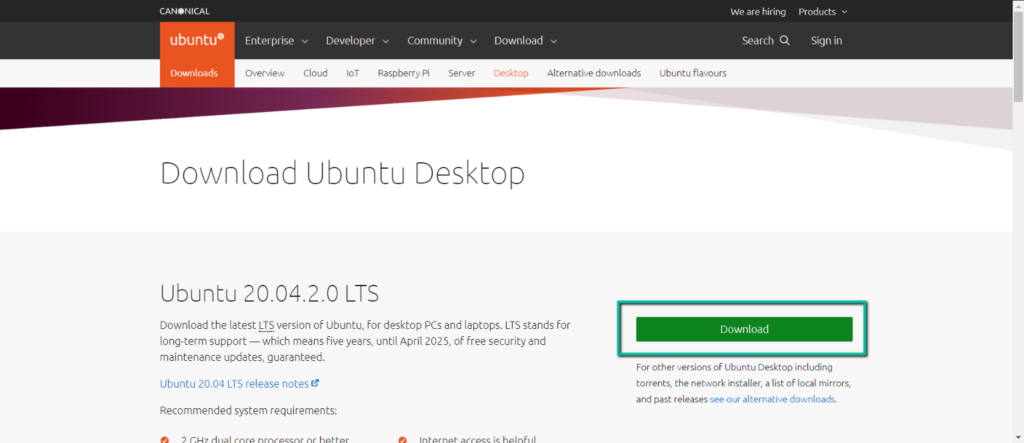
Go to Ubuntu downloads page and click on Download button to download latest Ubuntu version.


This will download .iso file to your system. We will use it later during VM setup.


Create new VM in VirtualBox
Click on New button in the top panel or under Machine menu.


Enter name and operating system details
On the next screen you will be prompted to enter:
- Name: What you want to call your virtual machine as
- Machine Folder: Where you want to create new directory and store the VM files
- Type: Type of Operating System to be used
- Version: Operating System name and version
I have used below details for my VM, you can change the name and folder but type and version needs to be the same.


Click on Next.
Memory size for your VM
This configuration really depends on your requirements and also the limitations of your host machine. How I personally like to start things is with setting up slightly higher values than minimum or follow the recommended size mentioned on OS MTRs in this case, Ubuntu system requirements.
For this machine, I will go with 4GB of RAM to start with and in case required in future I can always increase or decrease it as per requirement.
Enter 4096 in input field or use the slider to adjust RAM size and click on Next button.


Create virtual hard disk
This step allows to choose between options related to adding hard disk to the virtual machine.
In this step we will select the option to Create a virtual hard disk now and click Next.


Choose Hard Disk File Type
In this step, we are allowed to choose which file format should be used to store hard disk data. If you would like to use the same set of files to launch your VM in another virtualization software, for e.g. VMWare, then since VMWare supports VMDK files, you should select VMDK option.
But if you are planning to use it only on VirtualBox then you need to make any changes. Use the default option selected, which is VDI (VirtualBox Disk Image)


Dynamic or Fixed Size Storage
In this step we are provided an option to indicate how we want the storage to be used on our host machine. A simple way to determine this is to identify the use case for your VM. If you are going to setup VM and work on it extensively, then you would also be willing to allocate a large space to it. In this case I suggest you to use the Fixed size option. Note that using this option may take longer time during creation of VM but in long run, it would work faster than other alternative.
But if you are not going to use this VM too frequently and you are experimenting with it, then using Dynamically allocated option is advisable, as this is faster to create.
Click Next once you have chosen suitable option.


VM file location and size
In this step we can configure file size to be used for VM. In case you are going with fixed size option in previous step, this much space will be utilized upfront, and in case you are going with dynamically allocated option in previous step, then this is the maximum size till which your VM will grow. It acts a protective measure to not exhaust your host machine’s physical storage and keeps VM contained.
I am going to go with default 10GB option as I don’t want this VM to occupy too much space on my host machine.


Click Create once you have finished configuring file size and file location.
Adding Ubuntu ISO to VirtualBox VM
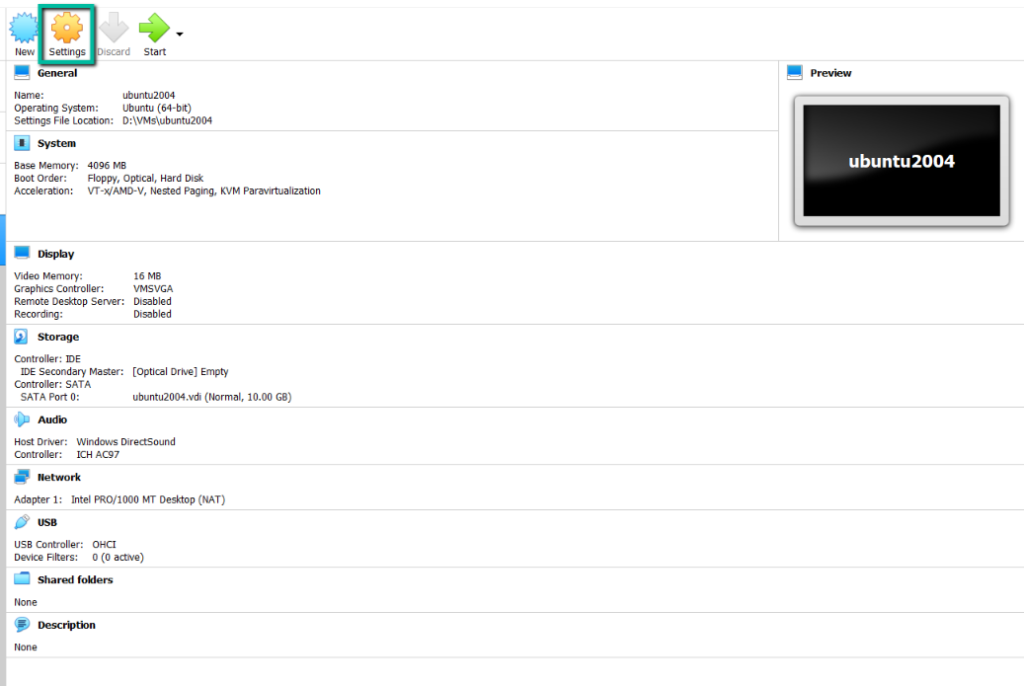
After you have finished the previous step, you will be presented with VM information screen. At this point we have completed creating the skeleton of the system or imagine that we have assembled the server.
But we have still not added our ISO file to the VM. Hence the VM does not know where to boot the operating system from.
In this step we will add Ubuntu ISO file to new created VM.
Click on Settings button on the VM information screen.


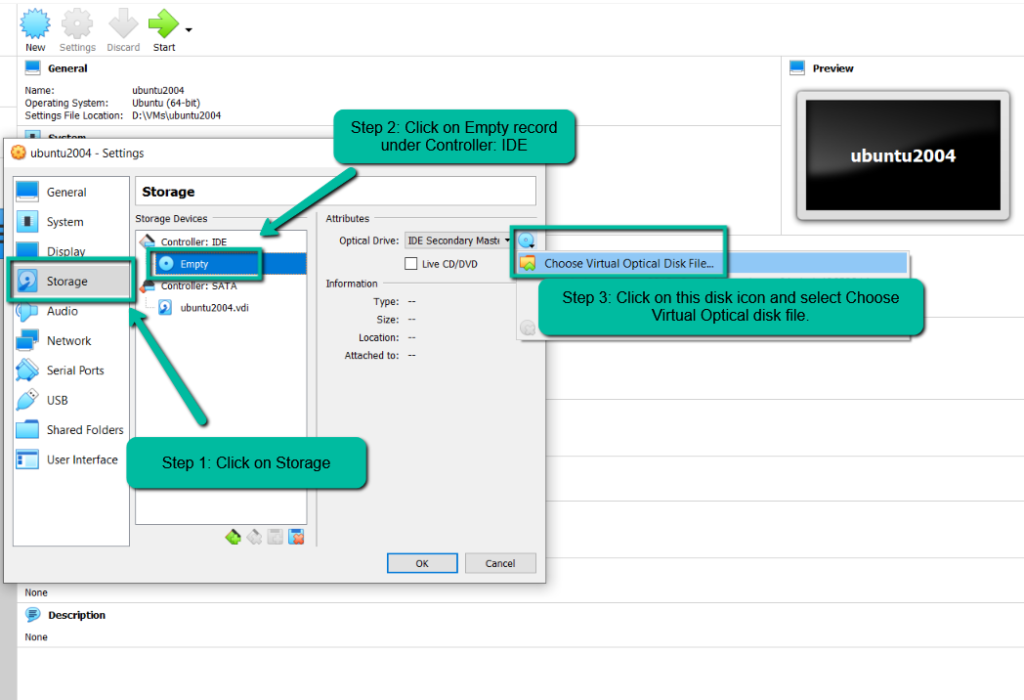
Follow these 3 steps to launch file selection prompt where you will select ubuntu iso file.
- Click on Storage in side panel
- Click on Empty record under Controller: IDE option
- Click on the Disk with dropdown Icon and click Choose virtual optical disk file


Your iso file should replace the Empty record and you should be able to see a screen similar to this.


Click OK button.
Start Virtual Machine
We are all set, let’s launch this beast.
Click on Start button.


Startup process should begin and you will see a screen similar to this:


Installing Ubuntu
Installation will take you through several steps, I am posting screenshots below of the screens I encountered. By the time you are installing, you may see different screens depending upon the latest version at the that time. But installation basics would remain the same.
Select your preferred Language and click on Install Ubuntu.


Select Keyboard Layout and click Continue


For updates and other software I will leave the default settings and click Continue


Under Installation Type select Erase disk and install ubuntu and click Install Now.


On Write Changes to the disk prompt, click Continue


On Where are you prompt, select your location and click Continue.


On Who are you prompt, enter your details and click Continue


Wait for the installation to complete, it will take a few minutes.
Once installation is complete, you will see below screen. Click on Restart Now button here.


You will a message “Please remove the installation medium and then press ENTER”


To remove installation medium, open VirtualBox (not the VM, but VirtualBox application itself) and click on newly created VM. Click on Settings and under Storage verify that Controller IDE has empty record again.


Go back to your launched VM and press ENTER.
Click on the user name on login screen


Enter the password that you had setup while creating account and press ENTER.


You will be presented with a screen where you can connect your online accounts. I will skip this step by clicking Skip button.


Click Next on the screen that follow:


Click on Done.


You might see a screen like this in case there any updates. I am choosing to skip this step for now, but you may want to install the updates.


And there we have it, our Ubuntu is ready to be used.


Hope you enjoyed this tutorial as much as I enjoyed writing it!
I am sure some of you may face issues during VM creation or launching. Most of the times updating to latest version of VirtualBox should fix those issues. In VirtualBox, you can click on File > Check for updates and follow the link to download and install latest version.
If you found this tutorial useful, please let me know in comment section below.
