Google Webmaster Tools Tutorial – Efficient, Optimized & Simple SEO
Every webmaster who has ever worked on Search Engine Optimization (SEO) has most likely used Google Webmaster Tools. This tutorial on Google Webmaster Tools will make you understand, how to use Google Webmaster Tools to the fullest and thereby increase traffic to your website. After Google launched the new interface for Google Webmaster Tools, it also added many new features to the system. But with addition of so many new features, things became complex and some of our webmasters are still struggling to understand some of these features. This article is pointed at those webmasters who are using Google Webmaster Tools but still are not able to figure out a way to make the most of it. Considering that you reached this article, I believe that you already have a Google account and a website added to your Google Webmaster Tools, if not, you can read this extensive tutorial on How to add a new site in Google Webmaster Tool.
Let us now start understanding how things work and what means what. I will provide in depth details of each of the modules that you can use in Google Webmaster Tools, you can directly jump to your favorite one if you wish too.
Table of Contents
Dashboard
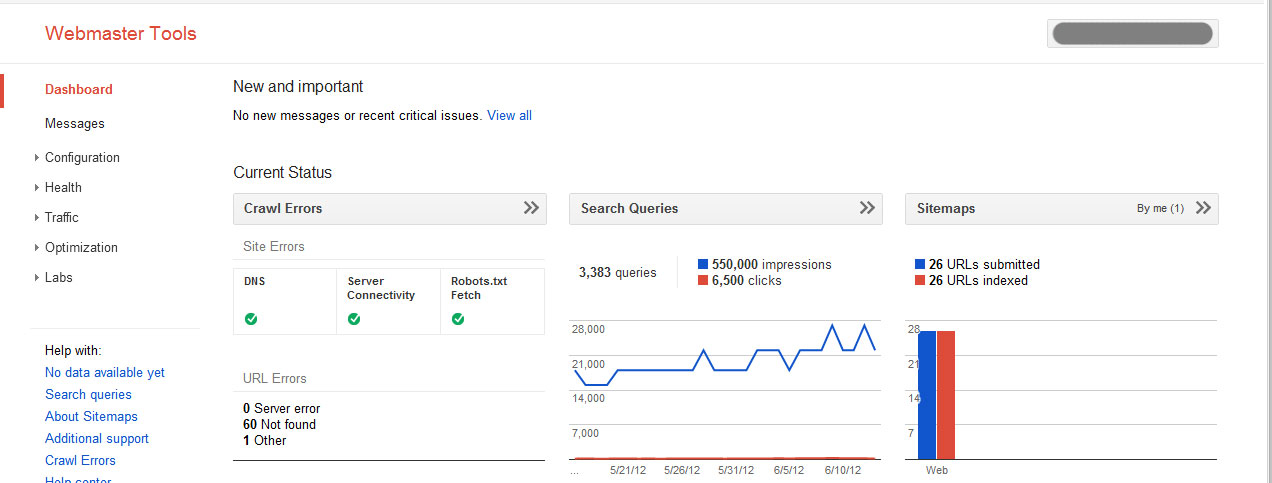
Dashboard is the first thing you see when you manage a particular website which is added into your Google Webmaster Tools account. It presents to you an quick overview of some of the important things related to that particular website. To cut the long discussion short it basically shows your 4 important things.
- Number of messages you are yet to read.
- Crawl errors that occurred when Google Bot visited your website.
- Search Queries that are related to your website.
- Sitemaps submitted and corresponding URLs indexed by Google
You can click on those buttons or you can access them directly from the side panel. I will be tell you what they are and how they work in this very post ahead. If you just want to know where you can find each of them directly, then here is the process :
Messages can be viewed by clicking on Messages in the left hand side panel.
Crawl errors can be viewed by Clicking on Health > Crawl errors.
Search queries can be viewed under Traffic > Search Queries.
Sitemaps can be viewed in Optimization > Sitemaps.
Each of them are explained in detail in this post ahead.
Messages (Inbox only)
![]()
Important information and messages about critical issues related to your website are sent to you by Google. These basically include the messages that inform you about the changes made to your website by you or another admin. Changes such as demoting URLs or removing URLs are the once that result in getting a notification in your messages. Another issue is of DMCA complaints. If you have a forum or if your website distributes copyrighted material, and if Google receives a valid DMCA complaint for the same then it removes that particular URL from its search. Google informs you about the complaint and provides with the complaint details. These are shown in your messages folder. You may note that this is an inbox only folder. You can view and delete messages from here but are not able to reply. It can prove to be very useful for you. Consider a situation, if you have a website and you forget to add a contact form or mention contact details. Now if you by mistakenly reproduce or distribute copyrighted contents on your website and the original author or owner wishes to inform you but he is unable to. Then he will first inform Google to remove your URLs from search, and since he cannot reach you, he may inform your hosting providers about the details which may then suspend/terminate your account immediately. Now if you had added website to Google Webmaster Tools then you would have received information regarding the same and things would have been better. There are many more examples and many more advantages of this module which is left to the reader to understand and learn.
Configuration
![]()
If you are an advance user you may understand this part easily. For an upcoming webmaster, this may be slightly difficult to understand, but I will try my best to put it in as simple words as possible.
Configuration is further subdivided into five sub parts as shown in the above image.
Settings
Here you can configure three different options.
Geographically Target Users
If your website is specifically made for particular users from a selected part of the world or especially only for a country, then Google allows you to choose the country. You can thus make it easy for Google and yourself to make your website available to particular group of users rather than others.
Preferred Domain
Some like it short, some like the www. Depending on what you like you can choose the particular domain preferrence here. If you are fine with either of them then you can choose Don’t set a preferred domain. My suggestion : If your domain is longer, select the option without the www in the domain.
Crawl Rate
This option is available only for non blogger hosted websites. If you have a website with like millions of posts and articles then Google Bot might contribute fairly to the server load due to its crawl rate. You can thus set the maximum allowed rate at which the bot will crawl. This request set ranges from 0.002 requests per second to 2 requests per second.
Sitelinks
It happens many a times that same page of your website can by reached at via multiple links. Now, if your post is showing up in Google search but the link shown is not the one your desire, then you can demote that particular link from here. In short, if your link, say http://www.example.com/thread/1234 is indexed but it can be also reached by http://www.example.com/how-to-use-google-webmaster-tools.html the you might choose to demote the first link using this module of Google Webmaster Tools.
URL Paramters
This option is only for advanced users, if you ask me. Parameters are the values that you can pass via the URL. Now, suppose your website is a PHPBB Forum, then your topic links are of the format, www.example.com/viewtopic.php?f=2&t=426. If you have used or visited PHPBB forums before then, if you ever tried changing the value of f parameter, still the same topic loads. For example, www.example.com/viewtopic.php?f=10&t=426 would open the same topic as that by www.example.com/viewtopic.php?f=2&t=426
Thus such parameters are marked by Google as the ones that do not affect the page’s content. You can manually set them in this module of Google Webmaster Tools or just leave it to Google to handle them. This can be very useful if it incorrectly marks parameters as the ones that do not affect the content of the page, even when they actually do. Then you can change the settings for that particular parameter here.
Change of Address
If you bought a new domain and redirected your old website to the new one, then you might want to use this option. Before using this option, there are few things you need to do. They are as follows :
- Publish the content on your new website.
- Setup 301 Redirects from your old website to new one.
- Add the new website to your Google Webmaster Tools Account
Once you have performed the above mentioned things, you can proceed to select the old site and new site from this option and click submit to inform Google about the transfer.
Users
This page shows the details of the users that have added the website to their Google Webmaster Tools Account. If you have verified your ownership for the website then you can add or remove site owner from this interface.
![]()
This module helps you diagnose the health of your website. As in, what errors your website gives, how your website appears for Google, which URLs are blocked in Google etc. As you can see, it provides with five more options to browse from.
Crawl Errors
There are three different sub parts of Crawl Errors :
- Server Errors
- Not Found
- Others
Server Errors are basically generated when requests time out when Google Bot tries to fetch your page or when your site blocks Google Bot. These are usually zero, but may exist if your server goes down when Google bot tries to fetch a page or if you have blocked Google from fetching pages from your website.
Not Found are the 404 errors generated on your website at the URLs pointed by other websites or the ones specified in your sitemap. Whichever maybe the reason you must fix them if possible or handle them appropriately so as to make your visitors experience better if not the best.
Other errors include errors while Google bot tried fetching page but could not access it. These generally occur when your server does not understand syntax of Google bot’s request.
You can always solve these errors for particular (individual) URLs and then click on them and select Mark as fixed.
Crawl Stats
Statistical data about Google bot’s activity is displayed in this part. It includes three things, namely :
- Pages crawled per day
- Kilobytes downloaded per day
- Time spent downloading a page (in milliseconds)
Blocked URLs
If your website has content at particular URLs that you do not wish to be shown up on search engines or put in another way, the content which you do not wish the Google bot to browse can be mentioned in the robots.txt file placed in the root directory of your website. This page shows the information about the same. If you have by mistakenly blocked Google bot, then you will prompted about the same. You can then perform necessary changes to your robots.txt file to block or unblock URLs in Google.
Fetch as Google
The website may be loading for you but it may not be getting indexed in Google. You can test if a particular page on your site is working properly from the point of view of Google bot by fetching the page as Google from here. This can also be used to getting indexed quickly. But you will have to manually fetch particular URLs for the same.
Malware
This page shows you the details of the URLs from which Malwares were detected from your website. You are advised to take care of them and fix them ASAP. It is a really bad sign to get tagged as Malware distributing website. It takes minutes to destroy something you created with hard work and dedicated efforts over the years. So pay special attention to this part atleast once a day, if possible.
Traffic
![]()
The most important and crucial part of any website is the traffic it get. If there are no visitors to a website, there is no point in creating one! This module of Google Webmaster Tools provides you the details about the traffic that is sent to your website by Google. As shown in the figure, it is subdivided into four parts.
Search Queries
This in itself is an extensive topic to talk on. I will try to summarize it in short but covering as much details as possible.
This section is further distinguished into two parts based on Top Queries and Top Pages.
Top Queries :
You can see three different boxes named, Queries, Impressions and Clicks.
Queries : These are the number of search terms entered in google to which your websites page was shown in the search results page on Google.
Impressions : This the number of times your page showed up on a user’s screen in the search results. For example, say you search for some famous celebrity, the first result is most likely from wikipedia. You happen to click on the wikipedia link and exiting the search result’s page. Now when you searched for that particular celebrity there were 10 results show on the result page. All those 10 results’ website gets 1 impression each but only wikipedia got a click and an impression, both.
Click : It is the number of times the user landed on your website by clicking your website’s link shown on a result’s page.
If you scroll down further more, you can see a table with header columns as ‘Query‘, ‘Impressions‘, ‘Clicks‘ and ‘Average Position‘. The first three are explained above, for the last one, average position means the average standing or ranking of your website in Google’s search engine for that particular keyword mentioned under the Query column.
If you notice above the table, you can also see two choices to choose from, ‘Basic’ and ‘With Change’.
The default option is basic, if you select ‘With Change’ then the table is modified to show the change happened in the corresponding field over the period of time which is selected at the top right hand corner on the same window.
If you have a large website and huge amounts of organic traffic comes to your website, then you might want to filter the queries to study only a selected few. For that you can use the filter option provided on top of the left corner of the table.
Top Pages :
Top pages options shows similar type of data as shown by Top Queries, the only difference is that in Top Pages, the first column of the table points you the page link to which the traffic had reached and the remaining columns for that particular row mark the corresponding values for attributes as mentioned by their respective titles.
The chart provided on top of the table is like the icing on the cake. It enhances user experience and brings simplicity to the system for new users.
Links To Your Site
This page shows you four important things :
- Total Links
- Who links the most
- Your most linked content
- How your data is linked
Total links is the number of links to your website from other sites. These include the links from individual pages of that other site as well and not just a single link from each site.
Who links the most displays the sites sorted in descending order of amount of links they provide to you. You can click on the name of the site to visit further details about the URLs to which the other sites links to from their pages.
Your most linked content shows the pages in descending order. The page most linked is shown at the top and so on.
You can click on individual page to find out who links to that page and how many times from the entire website.
Internal Links
These are the internal links i.e. the links provided on your website that point to pages of your website itself. Here you get to see a list of links, when you click on one of them, you are shown the pages which link to that particular page which you chose.
